Thursday, December 30, 2010

The Good....and the Bad....Back to Back Brew Sessions

12.27.10 began the nightmare of the Drunken Uncle Dunkelweizen. Sure, I thought it would be easy. I made a yeast starter Christmas night and was set up for an easy morning sanitation and simple dark wheat brew session. So I thought at least. I should have realized almost immediately that this was going to be bad. I hooked up the hose to start washing down my system when it froze almost instantly. No worries though, I disconnected the hoze and hooked it up where my washer connects to the water supply.

The overall brew session went fine in the first half of the day. We hit our strike in temps, held our mash temps, and properly stepped up our mash. It was when we sparged that we noticed a great deal of grain passing through the silicone tubing. I've noticed it before when doing batches so I didn't think much of it. The false bottoms help to keep grain out, help being the key word. We would later realize that about 2 gallons of volume was due to grain occupying the boil kettle.

Needless to say, we couldn't tell how much grain was in the boil kettle until we drained the cool wort out, but cooling the wort turned out to be a 3 hour fiasco. Grains got through the 3-piece ball valve, but clogged in the therminator (lead chill plate system).

Initially we weren't sure of where the clog was coming from so we tested all avenues of possibility. We confirmed that flow was passing through the 3-piece drain valve, through the pumps and back up through the outlet side of the pump, but not the therminator. We put the keg in a pile of snow but the snow was not match for the volume of hot wort. It was at that point we decided to drain out the wort into the fermenters, cap it with an airlock to prevent contamination, and let it sit over night to chill before pitching the yeast.

While it was fun in the beginning, it quickly became a brewer's nightmare and put a damper on the day. The good news is that we were sitting at 1.059 OG and pulled a quick fermentation time. The bad news is that we were supposed to extract 11.00 gallons of wort and ended up with 9+ gallons.

Here's the Drunken Uncle Dunkel fermenting through.

She'll pull through nicely I'm sure with that spicy, phenolic Weihenstephan Yeast, though I don't think I've ever had a true DunkelWeizen. First time for everything.

A Restless Evening

After that horrible brew session, I determined myself to remedy the situation. http://www.homebrewtalk.com/ was the source for some good answers. Here's what I came up with:
  1. A False Bottom is not enough by itself to stop trub and grain from getting through.
  2. A Hopbag adds protection
  3. A kettle screen (bazooka screen) supplements the grain bag and keeps everything out
  4. A whirlpool helps to keep trub to sides of kettle when draining.

I moved ahead with a few of these options. I bought a kettle screen and constructed a hopbag solely from homedepot parts. The hopbag was nothing more than 4 10" bolts, a 5" PVC connector pipe , a 5 gallon nylon paint strainer bag, and an adjustable clamp.

The hopbag is exactly what it says, but also more. When I transfer wort from the mash tun into the boil kettle, I let it pass through the hopbag to collect any loose grains, etc. I can then remove any loose grains collected and achieve my boil volume. Then, when I boil and add hops, some of the trub will remain in the hopbag, but unfortunately not all. The kettle screen adds to the equation by blocking any particles from passing through the drain valve. Marvelous!
Today I put the modifications to the test, and let me tell you was I pleased. I brewed up 10 gallons of Orange Pale Ale and ended up with 10 gallons in the fermenter. Here are some pics and videos of todays solo brew session.

The Hopbag I built for about $7.

Hopbag while transferring wort into boil kettle.

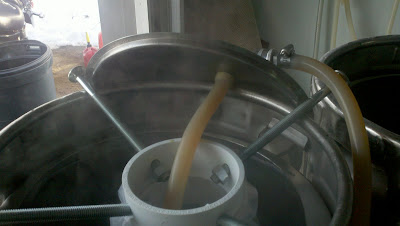
Hopbag with grains after transferring wort into boil kettle. It caught them
Hops in hopbag.

This is the setup when chilling wort with hose.
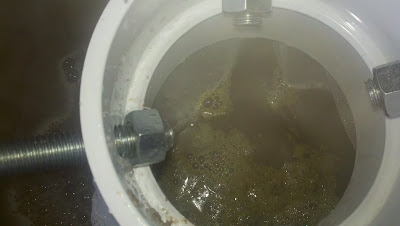
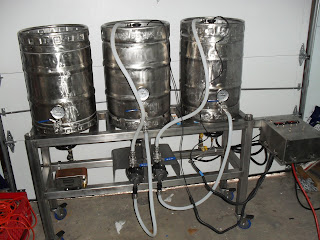
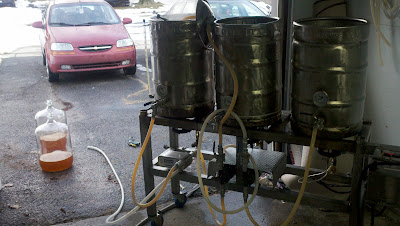
This is the setup chilling the wort with a recirculated ice bath
Here is a video of the chilling process, part 1: http://www.youtube.com/watch?v=M6nZ_qRwrbw

Here is a video of the chilling process with a recirculated ice bath made from snow, part 2: http://www.youtube.com/watch?v=aCfs1EX29g8

Chilled wort: 65F in a little over 15 minutes.

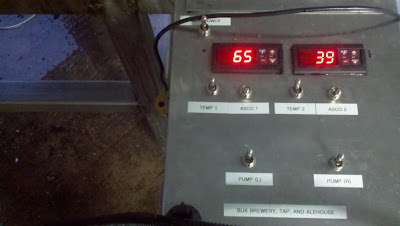
A lot of trub still gets past the hopbag as you can see here on the kettle screen.


Cheers!

Monday, December 6, 2010

Label Making


Completely unnecessary, yet so fulfilling. Making labels for my latest porter was a project and a half considering I have no photoshop skills, however, i think they turned out marvelous. I put about 85-90% of the work into and my soon-to-be wife took care of the kinks. I managed to do things with the software that she never figured out for herself. The difference between her and I is that she does it for work and I just clicked around and accidently ended up doing unwanted things.

Being that my graphic design skills are so basic, I stuck with a black and white design. Next time of course I will work on adding color, etc. I've been looking at labels from all types of beers and found some common components in many of them. Almost all are color, some utilize clear labels, but almost all have some facts, descriptions, and origins of the beer/brewery itself. In comparison, mine is black and white with some color, uses a white label, and has descriptions of the beer and some homebrew notations. For example, I have a statement that states, "Please recycle by returning empty bottles to Halbe."

I am doing this for pure enjoyment and that's it. Labels cost money, printer ink cost money, and bottles cost money. I can reuse the bottles in two ways. If I do the same batch again I can reuse the labels too. They hold fairly well. If I decide to do a different batch I can apply some heat and carefully remove the label and insert a new one. I could even half-ass it by just smacking a new label over top of the old. Actually, that brings up a funny point. Lagunitas Brewery in Cali decided to get very daring with their commercially available brews and started creating very whacky labels, infringing the copyrights of famous songwriters and remarks about LSD, jail, etc. Needless to say, the Cali government stepped in and they had to cease. Instead of pouring beer down the drain (Lagunitas brews about 50,000 barrels of beer per year), they just stuck duct tape over the infringement, crossed it out with crayons, markers, etc. People were buying good beer that came in a package that looked something like a moonshine bottle.

Anyway. Here is my first label. I may make some changes before I print them all out. I have to make sure the beer turns out well before I label 3 cases of porter. If it doesn't, then I will brew again. I am confident though. I hit my numbers and the beer tastes great pre-carbonation. I have come a long way in brewing over the past 3 years. What's really interesting is the palate and nose I am developing for beers. Take a look at the label and you will see that I already have a description of the beer and it's not even ready. This is in part because a pre-carbonation taste gives off the obvious flavors (nut, roast, etc) and the grains and hops tell me how it is going to pan out as well. So here's to it.

The holidays are gonna be great as I will have a keg of belgian dubbel on tap, a keg of porter on tap and 3 cases of porter to be consumed. On top of that, it looks as if we are brewing something between xmas and new years, so even more beer to come in the next few months. Let me know what you think.

Sunday, December 5, 2010

The Belgian Dubbel Experiment


Brewed 10.20.10
Fermentation: Primary 3 weeks, Secondary None
Kegged/Bottled: 11.14.10
Drinking: Now, but beer is a little green still

So we put the brewery to the test with this one, and it looks as if it is panning out as planned. After having worked out many of the kinks with my system and successfully brewing my biggest and most complex beer to date one can live by the notion that anything is possible. Sitting at a respectable 9.83% ABV and utilizing a complex grain bill, this beer enters my bloodstream as anticipated. The biggest challenge with a beer this high in alcohol content is masking the alcohol itself with the subtleties pulled through from the grain bill. Here's how it went down.

11.50 Gallon Batch
OG: 1.085
FG: 1.010
Color: 21.6 SRM
IBU's: 20.5
Calories: 375 cal/pint
Yeast: Trappist Ale WLP#500
Yeast Starter: Yes, 2 Liters

19.71 lb Pilsner 2-row (Belgium)
6.57 lb Munich Malt (20 L)
1.10 lb Caramunich Malt
1.10 lb Special B Malt

3.28 oz Saaz Hops (FWH, 90 Minutes)
2.74 lb Dark Belgiam Candi Sugar

Mash @ 150F 90 minutes, Boil for 90 Minutes

Double Batch Sparge

Ferment at 68F

There you have it. So if you took a close look you can see some very interesting things going on here. First, I had no secondary fermentation occurring here. Belgian beers and wheat beers tend to have a cloudy appearance as part of their character and style. Secondary fermentation assists in removing any haze by filtering out additional sediment. Depending on the beer, secondary fermentation may be required or may not. In this case it was not, but in the case of my recent porter it was mandatory.

Also, look at the brew date and the drinking notes. This beer was brewed almost two months ago and is considered green. A beer this complex requires aging to mellow out. I mentioned that it tastes a little green. This is for 2 obvious reasons, the first being that I can still taste the alcohol. It takes some aging to get the flavor in the grains to pull through and override any alcohol taste. Note that it wont entirely mask the alcohol but more so than it currently is. Secondly, the aging process assists in the removal of any yeast flavors and aromas. I mentioned that I used Trappist Ale Yeast and increased cell count with a 2 liter yeast starter. That is a lot of yeast, but it is needed to convert massive amounts of fermentable sugars over to alcohol, all 9.83% of it. My first swig a week and half ago was very yeasty in flavor. Since then, that unwanted flavor has subsided. I planned this beer just right because I wanted to drink some good beer just in time for the holidays. Looks like I will be.

Take a look at the calories in this recipe. The software I use, Beersmith, calculates the amount of sugars and starches possible to yield of each grain and converts that to calories through a formula I am unaware of and uninterested in learning. 375 calories is no Mich Ultra, it's more like a cheesecake dessert. I am not worried though because this is 2 beers and out. I don't see myself drinking 6 in a session, but you never know.

The hop schedule is the only simple thing about this recipe. The recipe calls for first wort hops @ 90 minutes, Saaz hops. This makes perfect sense. It's lower in the IBU scale, bitterness at 20.5. You don't need any aroma hops because all aromas will be coming from Special B and munich malts. You don't know any less or additional hop bitterness because quite frankly, you can't even taste it. Plus, the mellow notes coming from the special b and munich malts allow for quite the taste, especially when combined with the sweetness coming from the belgian sugar. Too much bitterness would downright kill a beer this tasty.

Conclusion

Great beer at 1/4 of the cost. 4 cases for $95. Not bad, considering a case of Chimay would be $100. That's the beauty of homebrewing. No marketing, taxing, and overhead to pay for. To end this topic I would like to thank bucky for helping me out. It was a long arduous process, but will definately be a repeat. I don't know what else I would change. I'll have to see how this mellows out and revisit the thought. I invite you to come over and drink a few with me. Hail a taxi on your way out the door, you'll need it.

cheerios!

Friday, November 12, 2010

Efficiency Mods: The Results

So going back to a story previously told in regards to measuring efficiency, I now have some results to share. Disappointed with how poorly I missed my target volume efficiency, I went about some new modifications. Simple, yet elegant. I put a few things into the sytem just tonight alone.

First, I installed a sight glass into the boil kettle. This sight glass protudes out of the keg and runs parallel on the outside of the keg in a vertical position. Picture this as the handle to a milk carton. The handle on the milk carton shows the level of milk equal to that of what is in the container. The sight glass serves the same purpose as a keg is non-transparent. It measures up in increments of 1 gallon, starting at 3 gallons and ending at 15 gallons. I can use a ruler to get half gallon, two-third gallon increments, etc if need be.

The installation consisted of drilling a 9/16" hole near the bottom of the keg, inserting a threaded elbow, washer, and silicone gasket. It took all but 10 minutes to install and already serves a timesaver. Now when I have to put 13.3 gallons of mashed wort into the boiler, I just look over and turn off the pump as needed.

My second test was to conduct an evaporation rate experiment. I put in about 11 gallons of water and heated to 150F. I then shut off the flame, and pumped out 1 gallon so my remaining volume equalled 10 gallons. I stopped at 150F because normally when I mash i am in the 150-155F range. I adjusted and recorded 3 various gas valves to maintain consitency on future brewdays.

1.) Opened propane tank valve to 'full open'
2.) Opened boil kettle burner valve to 'full open'
3.) Opened adjustable propane regulator 1.5x and even took a picture to eyeball it up next time.

After that, I let her rip and get to a full rolling boil for about 1 minute. This is when I will add hops and start my 60 minute, 75 minute, or 90 minute boil timer. For this experiment I set my 60 minute timer. I had exactly 10 gallons and had been maintaining 212F for 1 minute. It just so happened to be 8:54 PM. Needless to say, at 9:54 PM I put the flame out. I had just under 8.5 gallons remaining. According to Beersmith (software I use), my evaporation rate is at 12%.

12% is a little on the high side, but it may be something I work on down the road. I may have to do another experiment where I crank the heat from mash temp levels to boiling and then adjust the flame to maintain a very soft, gently rolling boil. It may make a difference, it may not. We may never know.

At least I know I have a 12% evaporation rate. I adjusted my equipment profile on beersmith to calculate for that. Last bacth we brewed started with 13.3 gallons of beer and ended up with about 8.5 -9 gallons in the fermenter. My target was 11. The equipment profile was set up for 9% evaporation, hence the loss. Now, the same recipe says start with 14.4 gallons in the boil to end up with 11 in the fermenter. I can and should be able to achieve that now.

The third modification was those dreaded pumps on the wort chiller. After I boil, my goal is to get the boiled beer from 212F to about 65F as fast as possible to prevent infection/bacteria, etc. My first two batches ever went fine, but the last 4 batches gave me nothing but problems. Some of the connections used are stainless steel couplers (threaded with teflon), some were non-teflonned, and some couplers were even plastic. I had leaks in multiple spots. This is where the problem was. Where there is a leak, air gets in. When air gets in, pumps can't prime, etc.

I swapped out every plastic couple for new ss ones and taped every connection. The flow rate increases dramatically and the pumps primed instantly. Batch 1 and 2 cooled from 212F to 65 in about 15 minutes. Batches 3-7 took about 45 minutes. Tonights test run took 11 minutes.

212F - 100F took 5 minutes

100F- 90F took 90 seconds

90F- 80F took 90 seconds

80-68F took 150 seconds

I couldn't believe it. Rarely do I attempt 3 things and achieve them all. I was perplexed and surprised with joy after successfully making all 3 modifications tonight. They went as planned. Now I am planning on making a nice, creamy porter to get me through these cold days of winter.

Take care......until next time

Tuesday, November 2, 2010

Efficiency: Why and What You Need to Know

Ok, so you already saw the prequel to this post The Yeast Starter. The good news is that the 2000ml yeast starter was sufficient in handling the fermentation associated with this Belgian Dubbel/Trippel Chimay Clone. The funny thing is that on brewday we overshot our OG and ended with a higher gravity than anticipated.

This is due to several factors:

1.) Set my efficiency too low at 75%.

2.) Increased the grain bill to make up for an anticipated lower efficiency at 68%.

3.) Increased Dark Belgian Candi Sugar to make up for an anticipated lower efficiency at 68%.

4.) Boiled hot an heavy and evaporated too much water.

So basically, while this beer is going to be great, it taught me that I still have to determine my efficiency on my system. I'd be happy by all means with an efficiency in the 80 percentile, but would be astonished and dumbfounded if I could get an efficiency in the 90 percentile.

Efficiency is determined by calculating the total grains available for brewday and calculating how many possible fermentables were converted. Evaporation rate also plays a factor in the calculation. Essentially, if I set my evaporation rate at 9% per hour and boil off exactly 9% per hour; and if I have 30 pounds of grains and extract all the possible sugars from these grains, then I have 100% efficiency. It raises a good question that I'd like to know the answer for. What are commercial brewery efficiencies like? I'd be willing to bet they get 85-94% efficiency (possibly more), while homebrewers get anywhere from 60-90% efficiency, depending on the setup and equipment used.

I thought my efficiency would be determined over the last 5 batches, but the factors keep changing batch after batch. Number one being, I brew something different and a different quantity every time. I will do a dry run with evaporation rate. I will transfer water to the boil kettle at 150F as that is a safe mash temp and begin to boil. The second the first bubbly boil rises I will record how many turns my propane regulator is open and determine my true boil off at 60 minutes and 90 minutes being that these are the two most common boil times. This will assist me in my entire 'brewhouse efficiency.' Then I will do a cheap 1 gallon batch of just 2-row pale malt to see what my yield is, by calculating the mash/sparge process to my preboil gravity. This will determine my mash efficiency.

By default, Beersmith (the software I use to handle all my brewing calculations) is set at a 75% efficiency. Therefore, the grain bill, water quantities, etc is assuming a 75% efficiency. If I undershoot that 75% efficiency, then I have a beer with lower alcohol content than intended. Yep, that would be very disappointing. However, If I overshot the default 75% efficiency, then I would have a stronger beer. While that doesn't seem bad at all, it has its consequences. It actually tells me that I depending more on chance than pure science. Proper note taking allows one to make the same beer over and over again, just the way that one Budweiser batch after the other taste exactly the same. If you have various factors on different brewdays, its harder to replicate that. The more you control, the better off you are. The more you leave up to chance, the more risk you ensue.

So, let's take a look at what happened to me on this particular brewday.

We will look at Target Volume, Efficiency into Boiler, and Actual Volume Efficiency.


Brewhouse Efficiency Based on Target Volume

Actual OG: 1.083
Estimated OG: 1.075
Brewhouse Efficiency: 75.00%
Actual Efficiency: 84.56%


Efficiency Into Boiler

Volume into Boiler: 13.27 gallons
Planned Boil Volume: 13.27%
OG into Boiler: 1.067
Estimated OG into Boiler: 1.067
Efficiency into Boiler: 78.09%


Efficiency Into Fermenter

Actual Batch Volume: 9.50 gallons
Planned Volume: 11.50 gallons
Efficiency calculated from Volume: 68.16%


So, after reviewing the above, you will see I overshot OG by overcompensating my grain bill. I hit my OG into the boiler and the 13.27 as planned so I ended up with 78.09% efficiency. That's great. Where I failed is the efficiency into the fermenter because I planned for 11.50 gallons but only ended up with 9.50 so I had a 68.16% efficiency. That means I definately boiled off too much. I had the flame set too high. Once I determine my evaporation rate, it looks like my brewhouse efficiency would be 84.56%. That'll be something to be proud of. I'll send updates once I work on that.

Once I do that, I can set beersmith to calculate everything from grain bill to hop quantities to water needed to everything else at 85% and won't have to adjust anything. Like I said earlier, I assumed a 68% efficiency so I added more grains and more belgian candi sugar, and as a result ended up with an 84.56% efficiency in regards to Alcohol Content but underscored in regards to my final volume at 68.16%. I was supposed to have 11.50 gallons of beer to ferment, but ended up with 9.50 gallons.

Going back to the fact that I need to take good notes correlates with the fact that I am relying on chance. If this beer turns out phenomenal, I'll never be able to duplicate it without some sort of noticeable difference in character and taste, unless by chance I end up with all the same gravities and efficiencies mentioned above.

So now you know what Efficiency is when discussed in the homebrew community. By now, you should have some better understanding of how it affects your brewing process. Essentially, it affects the cost of the beer if you have to buy more grains than what would be needed on a more efficient system. You can utilize less of every ingredient with better efficiency and end up with more beer at the end of the day if you do it right. Needless to say, I am disappointed because I could have/should have had this all determined months ago. I have some work ahead of me and will report back.

Two new discussions in the works: 1.) The Chimay Clone Outcome and 2.) Using pumps and how to prevent wasted time from day 1.

VIDEO LINK: Just a quick shot at the brewing process. At this point, the mash tun (middle keg) is steeping 30 pounds of grains in 8 gallons of water at 149F. The HLT (right keg) is filled with 9 gallons of water and is in the process of being heated to 167F to use for sparging.

http://www.youtube.com/watch?v=MmwlmxfPmZs


Teaser: The Chimay Clone finished fermenting out at 1.008 from 1.083. Subtract 1.008 from 1.083 and multiply by 131 to get ABV. In this case, we're looking at a 9.82% beer. One and buzzed, two and drunk, three and you'll regret it.

Thursday, October 21, 2010

The Yeast Starter: Chimay

I'm preparing for one of my biggest beers yet. It is big in all ways- Big alochol content, big grain bill, big cost associated with it, and big chance of disaster. I am making a Chimay type beer, the closest thing to Chimay I know of, given what is available to the public. The only thing that is off for sure, is the second, proprietary yeast strain that Chimay uses when they bottle. I can't access that because it's, well.....proprietary to them.

In order to prepare for this beer I needed to create a yeast starter. Simply put, a yeast starter is an effective way to increase the cell count of viable yeast to better assist in the fermentation process. As i previously stated, this is a big beer, and by that I mean high alcohol, large quantities of grain needed. Going back to one of my previous posts, mashing the grains at specific temperatures allow conversion of the starches into fermentable sugars. Therefore, the more starches (grains), the more sugars can be extracted through enzymatic conversion (mashing the grains, aka steeping the grains) at specific temps. I've quickly bumped up from 5 gallon batches to 10 gallon batches, so I will use a 10 gallon batch in example. A typical ale, say a nice summer hefeweizen will maybe contain 16-18 pounds of grain for a 10 gallon batch. Each type of grain has an estimated 'output' of fermentable sugars. So 16 pounds of grain x may produce more fermentable sugars than 16 pounds of grain y, etc. Start utilizing 3 or 4 grains into a batch and you have to rely on software to do some calculations for you.

Since I am attempting to replicate Chimay, I thought of a few funny names, but chose the more appropriate one. Chimay Be Preggers, Chimayde Me Excited, and Chimay Be Back Belgian Dubbel. I went with the latter. Aside from rambling and back to the topic at hand, this 10 gallon batch doesn't require 16, 17, or even 25 pounds of grain. We're going to go ahead and use 29 pounds of grain for 10 gallons of beer.

What does 29 pounds of grain do to gallons of beer?

Well, it does a couple of things. One, it creates a high alcohol content. Two, it brings out the malt flavors as it goes into your belly. Part one is a no brainer based on what I just said above. Not only is it a no brainer, it's well received amongst my drinking friends. Part two is the tricky part. Beer isn't really supposed to be strong and it's not really supposed to taste like a shot of 151. With that being said, grain selection is critical in masking the high alcohol content. There are many malts that can do this, so let me share with you the recipe that Gook and I are cooking up this weekend.


GRAINS
19.7 lbs Belgian Pilsner
6.5 lbs Munich Malt 20 Lovibonds
1.10 lbs Caramunich Malt
1.10 lbs Special B Malt

HOPS
3.30 oz. Saaz @ First Wort Hop

MISCELLANEOUS
2.75 lbs Belgian Dark Candi Sugar

YEAST
White Labs WLP500 Trappist Ale

Original Gravity: 1.075
Final Gravity: 1.017
ABV: 7.59%

Continuing on.

We have 4 grains totaling just about 29 pounds, plus 2.75 pounds of belgian candi sugar. Is this starting to make sense now? If not, let me quickly walk through it. 29 pounds of grains will convert to more fermentable sugars than 15 pounds (which could be used for a summer hefeweizen or the like), plus there is 2.75 of dark candi sugar boiled too to add to the amount of fermentable sugars going into this beer. This is why I was saying all along how big of a beer this is. The original gravity is @ 1.075, my hefeweizen was like 1.048 and my orange pale ale was at 1.060.

Because there is so much fermenting that needs to occur in order to produce the alcohol content that we want, we need to make a yeast starter. One vial or packet of yeast just won't cut it. There are not enough viable cells to eat the sugars and nutrients and allow for proper fermentation, so we are going to increase the cell count through yeast reproduction. If you thought Ant Farms were cool, we heck, you can double, triple, quadruple, etc the size of your yeast colony. Go nuts!

So here's what I did tonight, and here is what all of you soon to be professional brewers can do as well.

HOW TO MAKE A YEAST STARTER

Items Needed
Stove
2 -4 quart pot for boiling
DME (Dry Malt Extract)
Water
Thermometer
Yeast
Flask or bottle or something to put liquid in.
aluminum foil
measuring cups
funnel
Sanitizer

Preparation

Sanitize flask/bottle, thermometer, aluminum foil, funnel (if applicable).
Take yeast out of fridge and allow it to hit room temperatue 70F or so.


This is a real simple process.


1.) Mix 2 cups of water with 1/2 cup DME or use this ratio to achieve desired quantities. 2 cups is in fact 500ml. I made a 2000ml starter so I used 4 cups water and 1 cup DME.

2.) Boil for 10 minutes and stir constantly, keeping heat controlled to avoid boil overs. Sugar (DME) and boiling water allow for a sticky mess.

3.) After boiling is complete (at this point the boil is now Wort), place stove pot in an ice bath in your sink or put the pot in your freezer. Use a sanitized thermometer to keep an eye on the temp.

Never pitch yeast above 90 F, you will straight up kill those little yeasties.

4.) Wait until wort is 75 or 70 and pour into sanitzed flask/bottle.
5.) Shake it around and get some oxygen in there.
6.) Pour vial or packet of yeast in sanitized flask/bottle.
7.) Loosely cover the top of flask or bottle with aluminum foil. Dont seal it or no oxygen/co2 can get in/out.
8.) Put it on magnetic stir plate and use it for brewday 12-36 hours later.
or
8a) If you dont have a magnetic stir plate, shake the crap out of it every 30 minutes (seriously) or it will just begin to proof and rise like a loaf of bread. You want the yeast to swim around in a frenzy and feed on the nutrients you just gave it, not sit around and die off.

That's it. So, the rule of thumb is typically if a beer is bigger than 1.060, you should create a yeast starter. Usually, the yeast package labeling will have some sort of guidelines.

There is more interesting stuff to come on this Chimay recipe. I have good reason to believe it very well could be 1.090 or 1.10, being a 10% beer. We'll save that for the next one.


cheers!


Wednesday, August 4, 2010

The Truth Behind Hoegaarden, If You Dare to Care

Hoegaarden is and has always been an enjoyable beer for me, among one of my favorite beers. I had no idea the truth until just a few weeks ago. You have to enjoy wheat beers to enjoy this beer. Comparable beers would be Blue Moon (which is actually owned by Coors, though they do their best to keep that secret from you), Weihenstephaner Witbier (The world's oldest brewery, founded 1040), and Celis White (which we'll get to).

So what's the scoop on Hoegaarden?

First, it hasn't been around long at all. It was all started in the 1970's by belgian brewer Pierre Celis. He named it after the town of Hoegaarden, which was producing wheat beers since the 1400's. The town of Hoegaarden had about 13 breweries and numerous distilleries at one point, the last brewery closing it's doors in the 1950's. Wheat beers were the prinicipal beer of this area, with common ingredients of Water, Yeast, Wheat, Hops, Coriander and Orange Peel. This style beer was on its way out until Pierre Celis stepped in during the 1970's.

His operation grew very quickly and he set up shop in an old factory in the town, now able to meet the demand of the customers. To his misfortune, a fire broke out and burnt his brewery inoperable. InBev (under a different name at that time) offered up loans so Celis could buy another building nearby to continue operations. InBev happens to be the largest beer conglomerate in the world now, which also owns Anheuser-Busch.

Celis worked to put his brewery back up in operations, but with ownership (significant loans) from InBev, Celis was under pressure to modify his beer to become more of a mass-market style wheat beer. Based on Celis's actions soon thereafter, I deem him an honorable man; a man of pride. He decided it was best to sell his Hoegaarden brewery to InBev and move on. Sure enough, InBev modified the recipe to make it more commercial to the masses, just as you would drink it today.

Don't get me wrong, I like the Hoegaarden I buy today. It's actually the only recipe I knew since i first had one in.....let's say 1996. The fact that it is owned and operated as a part of InBev doesn't affect any future purchase decisions. I buy mass-marketed beers and authentic microbrew beers. What matters most to me is, 'Do I like this beer'? If I enjoy it, then I'll buy it, or attempt to brew it myself.

But this whole series of events really got me thinking. What did the original Hoegaarden recipe taste like? Was it vastly different than the Hoegaarden we know today? My answer is, 'I don't know, but I'm about to find out'.

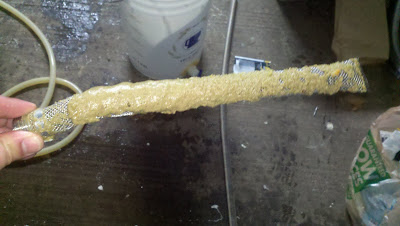
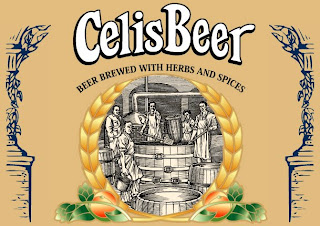
Pierre Celis decided to open up a brewery in Austin, Texas during the late 80's, early 90's and brew the beer he knew best. He set up operations quickly, under the name Celis Brewery. He manufactured his beers and contracted distribution to Miller for shares of his brewery. His recipe for the original Hoegaarden was branded Celis White. It didn't last many years, because when it came time to buy back his shares from Miller, he opted to sell the brewery to them. Miller took over ownership of the Celis Brewery, and then closed its doors due to weak revenues sometime in 2001.

That leaves me in a bit of a debacle. The Celis Brewery in Austin, Tx no longer exists. I previously stated that I'm going to try some Celis White soon. I have two ways to go about this, but which will give me a more authentic taste.

  1. Attempt to search online for an old, unopened case of Celis White dating back almost 10 years. Would it last? My guess is no, considering the high sedimentation of yeast that wheat beers have. You never know though, if it's stored in the right conditions then it could be like drinking a fresh homebrew.

  2. My other option is to find Celis White at a specialty beer store (Canal's in Jersey would probably have it), now revived from Michigan Brewing Company.

Soon after Miller closed the doors of the Celis Brewery in Austin, Michigan Brewing Company bought the Celis brand and continued operations. In late 2002, Celis hit the shelves and pubs in bars all over Michigan. Now, it's all over the place, just hard to find. The question remains, 'Does it taste the same as it did 40 years ago?' Did the Michigan Brewing Company obtain the actual recipe from Pierre Celis, or from Miller for that matter? We're not so sure about that.

I was perusing the web site http://www.michiganbrewing.com/ and they make a claim of "belief" that their Celis White brand represents the authenticity and natural flavors that were used by Pierre Celis 6 decades ago. Also according to the website, Pierre Celis visited the Michigan Brewing Company and agreed that its version was similar to the very original.

I could just continue to drink Hoegaarden, because I do like it, but at the same time I have a strong interest in trying the original Celis White from Austin, Tx. I don't see that happening, so I may just have to try Michigan Brewing Company's version of Celis and bellieve in the claim they make on their website. I may never know the truth.


Monday, August 2, 2010

Fermentation & Yeast

Fermentation & Yeast: The Do's and Don't's of Each


So what's the big deal about fermentation and yeast? Not much really, but if you don't follow these simple tips you ruin your batch of beer. Every batch of beer costs money whether you are brewing 5 gallons or 500 gallons, therefore a loss is a loss. Being that beer takes on average of 6 weeks from start to finish, every ruined batch is 6 more weeks longer you have to wait for the next.

Fermentation is a simple process, and is where the yeast 'feeds' on the fermentable sugars in the wort, converting the sugars into alcohol. During this process co2 is released from the fermentation vessel. A proper airlock with keep any bacterias from entering the fermentation vessel, preventing infection, all the while allowing the escape of co2, allowing the sugars to convert to alcohol. It's a beautiful thing really and without it it would be proof that God hates us all and doesn't want us to be happy. Lucky for us, he does want us to be happy, so this simple phenomena can occur (even at the homebrew level!).

Chronilogically, here is what happens during the brewing and fermentation process: in simple terms.

1.) Steep the grains at the ideal range of 145-158 F. This allows the grains to convert the starches to fermentable sugars. The result of this conversion is called wort.

2.) You then take the wort (malt extract) and add water to your desired batch size, boiling it for 60-90 minutes. A 90 minute boil will allow for a more crisp, dry taste (like a pale ale), versus a 60 minute boil resulting in a creamy, smooth stout (guiness). It affects the body of the beer. This is also where you would add hops and any other additions such as flavorings.

3.) After the boil, you must immediately cool down the wort as fast as possible to about 68 F for ales and 40 F for lagers and then transfer it into your fermentation vessel (typically a closed-lid bucket or carboy).

4.) Once your beer is cooled, you can pitch the yeast (aka, dump the yeast in) and let the fermentation begin. Fermentation can take anywhere from 3 days to weeks and months, depending on the beer.

5.) After fermentation is complete, you then transfer the fermented beer to bottles, adding sugar for carbonation, or to kegs, where you would force carbonate it with co2.

6.) Drink and Enjoy.

As you can see, there are really only a few steps involved in this process. It's because of the simplicity of this process that allowed people to drink beer for thousands of years. Don't be fooled though, it wasn't that easy long long ago. You'd be lucky to have 2 different styles of beer back then. This of course, was long before yeast strains and barleys became part of the international trade system. When thinking about this, think about your regional beers. Germany has a lot of wheat beers, because Germany is home to wheat. England is known for its English Ales because England has Pilsner malt, etc. You get the idea. Each style beer was the only option for beer hundreds of years in that particular part of the world.

And even though it's a simple process we tend to get caught up in the complexity of it all. Take make crazy homemade brewery I have going. I used to make beer using a $40 kit, now I use a handbuilt $.... system. So please, keep these tips for your own success. I've ruined batches before, so I can at least help others from doing it too. However, I'd still bet you my home that you will mess up one time or another.

Tips to Live By:

- Cool down the beer as fast as possible after the boil. The longer it takes to cool down, the more opportunity for bacteria to enter and cause infection. Some people use ice baths to cool down the beer. It can take hours in this process, but sometimes that's the only option. You can buy an immersion chiller http://morebeer.com/view_product/8766//B3-500_Immersion_Chiller_Option for under $60. This will cool the beer down in about 10-15 minutes. You want to cool it down in regards to the yeast you are using. When you transfer the beer to a fermentation vessel, get some oxygen in there, as oxygen help yeast multiply. Pour the beer back and forth from one bucket to another once or twice. That will allow for adequate aeration.

- Use a hydrometer and take a sample of the beer using a sanitized siphon or something of the sort. This is the Original Gravity (OG). Ex. 1.052. You use this number to determine alcohol content and to determine if your beer fermented or not.

-All yeast packages have ideal fermentation temperature ranges, so follow that. Most ales like to ferment between 60-75 F. Most lagers like to ferment at 34 F to 48 F.

- Do not pitch the yeast outside of this range. You can risk killing what were viable yeast cells. A typical dry packet of yeat contains about 200 billion cells, just enough for a 5 gallon batch.

- My personal preference is to ferment in a glass carboy versus plastic buckets. Plastic is porous, and the lids are not airtight. Plus, residues such as soap rinses from glass easier than plastic. You don't want any off-flavors in your beer do you? Oh yeah, you can't see through a white plastic bucket, but can see through glass. I like to watch fermentation from start to finish.

- Look for a layer of krausen (foam) to form within 4-24 hours after pitching the yeast. At this point you MAY or MAY NOT see bubbling occuring in the airlock. It's ok if it does not bubble. DO NOT use bubbling as a source to determine if fermentatin is active. DO NOT!

- After a week or two, take a sample of the beer (with a sanitized utensil!) and check the hydrometer reading again. At this point, the layer of krausen usually recedes and thins out and all airlock activity comes to a halt. The hydrometer reading should be much lower now. Ex. 1.012. This is your Final Gravity (FG).

- Determine alcohol content. Take your OG - FG * 131. In this case, it would be 1.052 -1.012 * 131 = 5.24% ABV. Use your head now. If the ABV is 2.3% then you did something wrong. You have never bought a beer that has that little alcohol, which means your beer is crap. Most beers are 4% or more.

Ok, I could write a whole book on fermentation alone, as well as yeast. So, I have to come back and revisit this topic again. There is too much to talk about, but for the beginner, this should help. We can talk about yeast starters, culturing, harvesting yeast, washing yeast, etc, all at a later time. Just know the key takeaways mentioned above.

Let me know if you have any questions though at any time. Facebook or jkhalbe@gmail.com.

cheers!

Sunday, August 1, 2010

SMaSH Brewing - Take One

There will definately be a Take Two, Take Three, Take Four, etc. I'm new to this concept, but this is a concept that has been around for hundreds of years, if not thousands. It's a simple concept, because simple is sometimes the best. So what is SMaSH Brewing?

SMaSH is an an acronym for Single Malt and Single Hop. Every beer I have brewed to date has had some complex grain bill, ie. 40% base malt, 30 % wheat malt, 20% specialty malt, and 10% adjunct malts, plus a varietal hop schedule, ie. 20% cascade hops, 30% hallertau hops, 50% styrian hops, on top of some flavoring additions such as 1 oz coriander seed and/or 1 oz orange zest, for example. As you can see, these beers are complex, requiring a bit of this and bit of that and lot of this and some of that.

It never crossed my mind to do something so simple until Farmer Ian dedicated some of his homegrown hops to my homebrew setup. Because he had homegrown hops, there was some risk associated with the use of hops that had an UNKNOWN alpha acid content. Hops are what determine the level of bitterness, aroma, and flavor are in a particular beer. For example, a 120 Minute India Pale Ale (IPA), continuously hopped through the boil with end up with a bitterness of 141. This number 141 is a defined numerical data point that correlates with the amount of alpha acid in hops. A wheat beer, which is not hoppy in taste, may have a bitterness of 10. This number is referred to as IBU's, or International Bitterness Units. Commercially grown hops are tested for their average alpha acid content, therefore a homebrewer or commercial brewer can accurately set the level of bitterness in their brew. A pale ale could have 40 or more IBU's, etc. It really depends on the style beer. Obviously, a hoppy beer will have a higher IBU score.

So, back to brewing, I decided that since I can not determine how hoppy my brew will turn out, we better play it safe, for economical reasons. I didn't want to dump $40 into 2 cases of beer, or $80 into 4 cases of beer for that matter. Hence, I felt comfortable spending $12 on 2 cases of beer ($6 per case for those mathematically challenged) that way if it turned out a failure I wouldn't be out that much money. This is where the SMaSH beer came to play. Less grains = less costs. By now you are probably asking yourself if you ever consumed a SMaSH beer. Chances are yes if you have ever had Urquell Pilsner.

SMaSH beers are great for beer drinkers and great for homebrewers. It goes down just as good as any other beer (good for the beer drinker) and allows the homebrewer to identify the subtleties of a particular malt and a particular hop. Put your magic to the test and try drinking a specialty beer that has 4 or more hop additions. There is no way you can point out the certain flavors from the different hops, its just too hard to know what each one is. Unless of course you completed the Beer Judge Certification Program (www.bjcp.org). It is the neither the prior nor the latter that appeal to me more, I like to drink beer and I like to further understand how particular malts and particular hops are affecting the flavors of my beer.

Today we brewed the Wet Hot American Ale, consisting of the following SMaSH (Single Malt and Single Hop).

Wet Hot American Ale
Batch Size: 5 gallons
Boil Size: 6.50 gallons @ 90 Minutes
OG: 1.050
FG: 1.012
Est. ABV - 4.92%
Fermentation: 5 days in primary, 5 days in secondary
Yeast: Safale-05 (American Ale Yeast, dry)
Malt: 10 lbs Vienna Malt
Hops:
1.1 oz Cascades @ 60 minutes
1.9 oz Cascades @ 20 minutes
1.0 oz Cascades @ dryop in secondary fermenter
Single Infusion, Batch Sparge, steeping @ 60 minutes at 151 F, sparging with 168 F water.

We were targeting an original gravity of 1.052 and ended just shy at 1.050. It's good enough for beer, that's for sure. This particular style American Ale requires an OG of 1.045 - 1.060, so we're safe. We're also safe if Ian's homegrown hops have the average 5.5% alpha acid putting this beer at 38.1 IBU's. The American Ale style guidelines call for 30 - 45 IBU's. The color was within range at 5.7, where 5-14 was needed. As long as the FG is within 1.010 and 1.015, then we will have an authentic American Ale. Now, in regards to Ian's homegrown hops, we have no way of testing the alpha acid content. It is very costly to do, so we'll just have to compare beers. I just did a quick google search and found that Budweiser's new American Ale is 28 IBU's, so as along as the Wet Hot American Ale has a pinch more bitterness to it, then we scored. If not, no biggie. That's why I only spent $12 on this batch.

Tune back for an update.

Special thanks to Ian for sharing some of his beloved hops with me.

Bavarian Witbier aka Hoegaarden Blue Moon

Brewed up 10 gallons (4 cases) of a Bavarian Witbier. I missed some of my target gravities but not by too much, it still turned out pretty tasty. We were all drinking some yesterday and I got some decent compliments. My rule of thumb is, If I wont drink it, then no one else will drink it either. So whether I miss my target gravities or not, It's all a matter of whether I drink the product in the end or not. In this case, we are. Here's the recipe:


2 lbs Rice Hulls

9 lbs Pilsner 2-row

6 lbs White Wheat Malt

5 lbs Flaked Wheat


1 oz Cascade hops 60 minutes

1 oz Cascade hops 5 minutes

1 oz Coriander seed 15 minutes

1 oz Bitter Orange Peel 15 minutes


2 pkgs Belgian Wit Ale Yeast WLP400


This style beer calls for an Original Gravity of 1.044 - 1.052. I ended up at 1.042. If i was paying attention, I could have just boiled longer and hit my target. As you can see, I wasn't off by much, so it only minimally affects flavor. In fact, it makes it just a little bit sweeter, leaving more fermentable sugars in the beer. Like I said, I'm enjoying it.


Wheat beers utilize yeasts that are very high in sedimentation. I probably lost close to a gallon of beer in yeast alone. As is typical with wheat beers, I did not ferment in a secondary because unfiltered beer is how these are typically served, resulting in a cloudy, hazy lemon color beer. As a result of high yeast sedimentation, the shelf life for Wheat beers, this one included, is about 4 weeks. Carbonation is very high compared to ales. I'm not sure why the carbonation is set high. It could have something to do with the shelf life, force carbing fast and then drinking fast, or what not. Anyway, here it is.


Friday, June 4, 2010

Brew Your Own Magazine - 250 Recipes

It's not your typical Maxim, Men's Journal, or Sports Illustrated magazine. In fact, I don't even recommend it for beer drinking enthusiasts. I do, however, recommend it to anyone who is into homebrewing or for someone who is contemplating the idea of homebrewing. It's a syndicated bi-monthly publication with tips, tricks, recipes and more all related to the art of beer making. I have been a subscriber for 6 months now and plan on renewing my subscription thereafter. It's this most recent publication I picked up that is probably the most informative and pertinent to me. Let me present you with this special newsstand only issue - 250 Classic Clone Recipes.

Because I truly enjoy the feedback from my 2, repeat, 2 blog followers, I have listed all 250 recipes below. So i call out to my 2 blog followers to leave comments on any beers they wish to sample in the future. When doing so, consider that certain trippels, lagers, and stouts will take months for completion, so consider some good winter brews too!

I have the recipes for all 250 commercially available brews listed below, so take your pick and we'll enjoy together. They are listed by Beer Style

STOUTS

Guinness Draught - Guinness & Co.
Guinness Foreign Extra Stout - Guinness & Co
Murphy's Pub Draught - Murphy Brewery
Beamish Genuine - Beamish & Crawford
Young's Doube Chocolate Stout - Young and Co.'s Brewery
Old Rasputin Imperial Stout - North Coast Brewing Co.
Fish Tale Trout Stout - Fish Brewing Co.
Lookout Stout - Haines Brewing Co.
Snowplow Milk Stout - Widmer Brothers Brewing
Oscar's Chocolate Oatmeal Stout - Sand Creek Brewing
Cappuccino Stout - Lagunitas Brewing Co
Oak Barrel Stout - Old Dominion Brewing Co.
Navish's Oatmeal Stout - The Portsmouth Brewery
Chocolate Jitters - Rocky River Brewing Co.
Double Black Stout - Red Hook Ale Brewery
Slow Elk Oatmeal Stout - Big Sky Brewing Co.
Giddyup Stout - Sweet Water Tavern
Yeti Imperial Stout - Great Divide
Sierra Nevada Stout - Sierra Nevada
Shakespeare Stout - Rogue Ales
Drake's Crude - Erie Brewing Co
Dragon's Milk - New Holland Brewing Co
Sweet Stout Clone - Hitachino Brewing
Extra Export Stout - De Dolle Brouwers
Dragon Stout - Desnoes & Geddes
Wolaver's Oatmeal Stout - Wolaver's
Chocolate Stout - Bison Brewing
Imperial Russian Stout - Stone Brewing Co.
Bitter Chocolate Oatmeal Stout 12th Anniversary - Stone Brewing Co.
Breakfast Stout - Founder's Brewing Co.
Double Stout - Hook Norton Brewery

PORTERS

BridgePort Porter - Bridgeport Brewing Co.
New World Porter - Avery Brewing Co.
Alaskan Smoked Porter - Alaskan Brewing Co.
Fredericksburg Porter - Fredericksburg Brewing Co.
Cutthroat Porter - Odell Brewing Co.
Black Butte Porter - Deschutes Brewery
Vermont Smoked Porter - Vermont Pub and Brewery
Old Leghumper Porter - Thirsty Dog Brewing Co.
Thirsty Trout Porter - Dark Horse Brewing Co.
Total Disorder Porter - Ram Big Horn Brewing Co.
Gonzo Porter - Flying Dog Brewing
Goddess Porter - Big Time Brewing
Old Slug Porter - RCH Brewery
Sinebrychoff Porter - Sinebrychoff Brewery
Darth Porter - Stone Brewing
Smoked Porter - Stone Brewing
Porter Potty Porter - Hank is Wiser Brewery
Edmund Fitgerald Porter - Great Lakes Brewing
Fuller's London Porter - Fuller, Smith & Turner

BROWN ALES

Newcastle Brown Ale - Scottish & Newcastle
Newcastle Brown Ale Old Ale - Scottish & Newcastle
Newcastle Brown Ale Amber Ale - Scottish & Newcastle
Indian Brown Ale - Dogfish Head Brewing
Turbodog - Abita Brewing Co.
Imperial Nut Brown - Tommyknocker Brewery
Capital Brown Ale - Capital Brewery
Carolina Nut Brown Ale - The Carolina Brewing Co.
Tablerock Nut Brown Ale - Tablerock Brewpub and Grill
Bell's Best Brown Ale - Bell's Brewery Inc.
Hazelnut Brown Nectar - Rogue Brewing Co.
Mud Bock Spring Ale - Otter Creek Brewing
Brewhouse Brown Ale - Real Ale Brewing Co.
Otis Alt - Elk Grove Brewery & Restaraunt
Iron Horse Brown Ale - Iron Horse Brewery
Hobgoblin Dark Ale - Wychwood Brewery
Double Bag Alt - Long Trail Brewing
Dragon's Milk Brown Ale - Triple Rock Brewery

RED OR AMBER ALES

Fat Tire Amber Ale - New Belgium
Full Sail Amber Ale - Full Sail Brewing Co.
Hopback Amber - Troegs Brewing Co.
Cambridge Amber - Cambridge Brewing Co.
Arctic Red - Yukon Brewing Co.
African Amber - Mack & Jack's Brewery
Alaskan Amber - Alaskan Brewing Co.
St. Rogue Red Ale - Rogue Brewing Co.
Rainbow Red Ale - Trout River Brewing Co.
Bulldog Amber - Cashmere Brewing Co.
Pinstripe Red Ale - Ska brewing Co.
Anniversary Ale - Amherst Brewing Co.
Glacier Ale - Red Lodge Ales
Abner Weed Amber Ale - Mt. Shasta Brewing Co.
Whistling Pig Red Ale - Jasper Murdock's Alehouse
Runaway Red Ale - Ice Harbor Brewing
Summer Solstice Cerveza Crema - Anderson Valley Brewing
Ten Penny Ale - Olde Burnside Brewing Co.

SCOTTISH & STRONG ALES

Traquair House Ale - Traquair House Brewery
Wee Heavy Scotch Ale - Steelhead Brewing Co.
Hope and King Scotch Ale - Minneapolis Town Hall Brewery
Winter Palace Wee Heavy - Paper City Brewery
Full Curl Scotch Ale - Midnight Sun Brewing
Old Ruffian - Great Divide Brewing
Gale's Prize Old Ale - George Gale & Co.
Black Douglas - Broughton Ales Ltd.
English Style Old Ale - Harpoon Brewery
Oakhill Yeoman Strong Ale - Oakhill Brewery
Merriman Old Fart - Merriman's Brewery

IPA's and BEYOND

60 Minute IPA - Dogfish Head Craft Brewery
90 Minute IPA - Dogfish Head Craft Brewery
Alesmith IPA - Alesmith Brewing Co.
Dreadnaught - Three Floyds Brewing Co.
Hop Rod Rye - Bear Republic Brewing Co.
Racer 5 - Bear Republic Brewing Co.
Pliny the Elder - Russian River Brewing Co.
Imperial IPA - Rogue Brewing Co.
Luginitas IPA - Lagunitas Brewing Co.
Acme IPA - North Coast Brewing
Elissa IPA - Saint Arnold Brewing Co.
Celebration Ale - Sierra Nevada Brewing Co.
Two Hearted Ale - Bell's Brewery
Ruination IPA - Stone Brewing Co.
Harpoon IPA - Harpoon Brewery
Bottleworks IPA - Dick's Brewing Co.
Samuel Smith's India Ale - Samuel Smith Old Brewery
Twin Sisters Double IPA - Left Hand Brewery
Hop-Head Imperial IPA - Bend Brewing Co.
Blue Dot Double IPA - Hair of the Dog Brewing
Stone IPA - Stone Brewing Co.
Torpedo Extra IPA - Sierra Nevada Brewing Co.
Punk IPA - Brewdog

PALE ALES and OTHER LIGHT ALES

Sierra Nevada Pale Ale - Sierra Nevada Brewing Co.
Anchor Steam - Anchor Brewing Co.
Bass & Co's Pale Ale - Bass PLC
Young's Special London Ale - Young & Co.'s Brewery
Fuller's ESB - Fuller, Smith & Turner
Redhook ESB - Redhook Ale Brewery
BAR Pale Ale - BruRm @ Bar
Terrapin Rye Pale Ale - Terrapin Beer Co.
Crooked River ESB - Crooked River Brewing Co.
Mirror Pond Ale - Deschutes Brewery Inc.
Full Suspension Pale Ale - Squatters Pub Brewery
Alpha King Pale Ale - Three Floyds Brewing Co.
Otter Creek Pale Ale - Otter Creek Brewing Co.
Bitch Creek ESB - Grand Teton Brewing Co.
Coopers Sparkling Ale - Coopers Brewery Limited
Tire Biter Golden Ale - Flying Dog Brewery
Red Tail Ale - Mendocino Brewing Co.
Shipyard Export Ale - Shipyard Brewing Co.
Hop Jack Pale Ale - Widmer Brothers Brewing Co.
Clearwater Light - Clearwater Brewery
Gaelic Ale - Highland Brewing Co.
Blue Whale Ale - Pacific Coast Brewing Co.
Warthog Cream Ale - Big Rock Brewery
Wisdom Cream Ale - Big Hole Brewing Co.
Vanilla Creme Ale - Market Street Brewery and Public House
Banks's Mild Ale - Wolverhampton & Dudley Breweries
Raven Hair Beauty - BruRm @ BAR
Two Rail Pale Ale - Red Car Brewing Co.
Shelter Pale Ale - Dogfish Head Brewing Co.
Tumble Off Pale Ale - Barley Brown's Brew Pub
5 Barrel Pale Ale - Odell Brewing Co.
Speedy Kiwi 5.6 ESB - Speedway Brewing Co.
Organic Best Bitter - St. Peter's Brewery
Green Lakes Organic Ale - Deschutes Brewery
Stone Pale Ale - Stone Brewing Co.
Summit Extra Pale Ale - Summit Brewing Co.
Summertime Kolsch - Goose Island Beer Co.
Lil Opal - Firestone Walker Brewery
Harpoon Summer Beer - Harpoon Brewery
Brooklyn Summer Ale - Brooklyn Brewery
Hocus Pocus - Magic Hat Brewing Co.
Archers Golden Bitter - Archers Brewery
Dead Guy Ale - Rogue Breweing Co.

WHEAT BEERS

Mueller Wheat - Springfield Brewing Co.
Blue Star Wheat Beer - North Coast Brewing Co.
Oberdorfer Weissbier - Allgauer Brauhaus AG
Easy Street Wheat - Odell Brewing Co.
Paulaner Hefe-Weizen - Paulaner Braueri GmbH & Co.
Double Eagle Ale - Rockyard Brewing Co.
Blue Paw Wheat Ale - Sea Dog Brewing Co.
Schneider Aventinus - G. Schneider & Sohn
American Hefeweizen - Laht Neppur Brewing Co.
Schneider Weiss - G. Schneider & Sohn

BELGIAN or BELGIAN-INSPIRED ALES

DeuS - Brouwerij Bosteels
Hennepin - Brewery Ommegang
Duvel - Duvel Moortgat
Farmhouse Summer Ale - Flying Fish Brewery
Saison Belgian Style Farmhouse Ale - New Belgium Brewery
Ommegang Abbey Ale - Brewery Ommegang
Orval Trappist Ale - Brasserie d'Orval
Westmalle Tripel - Brouwerij Westmalle
BJ's Grand Cru - BJ's Restaurant and Brewery
BJ's Millennium Ale - BJ's Restaurant and Brewery
Brother Larry's Belgian - Salmon Creek Brewing
Ommegang Witte - Brewery Ommegang
Devotion Ale - The Lost Abbey
Allagash Tripel - Allagash Brewing
Pecome Blonde - Red Rod Brewing Co.
Two Brothers Domaine Dupage - Two Brothers
Belgian Grand Cru - Worth Brewing Co.
IPAbbey - Ithica Beer Co.
St. Bernardus Abt 12 60th Anniversary Edition - St. Bernardus Brewery
Pike Tandem Ale - Pike Brewing Co.

LAGER BEERS

Shiner Bock - Spoetzel Brewery
Heineken - Heineken Brouwerijen
Warsteiner Premium Varum - Warsteiner Brauerei
Bitburger Premium - Bitburger Brewery
Ayinger Celebrator - Brauerei Aying
Creemore Springs Lager - Creemore Springs Brewery
Sin City Amber - Sin City Brewery
Sprecher Special Amber Lager - Sprecher Brewing Co.
Labatt Blue - Labatt Brewing Co.
La Conner Pilsner - La Conner Brewing Co.
Eastside Dark - Lakefront Brewery
Saint Arnold Summer Pils - Saint Arnold Brewing Co.
Pilsner Urquell - Plzensky Prazdroj
Sudwerk Hubsch Marzen - Sudwerk Restaurant & Brewery
John Courage Amber - Scottish & Newcastle PLC
See You In Helles - Snake River Brewing Co.
Odell Double Pilsner - Odell Brewing Co.
The Kaiser (Imperial Oktoberfest) - Avery Brewing Co.
Black Wold Schwarzbier - Flossmoor Station Brewing Co.
Munchner-Style Helles - Ham's Restaurant & Brewhouse
Smoke Creek Rauchbier - Great Basin Brewing Co.
Curator - Klosterbrauere Ettaler
Fred's Black Lager - Great Northern Brewing Co.
Organic Pilsner - Butte Creek Brewing
Black Radish Lager - Weeping Radish Farm Brewery
Schlitz - Joseph Schlitz Brewing Co.

SPECIALTY BEERS

Mo' Betta Bretta - Pizza Port Brewing Co.
Sanctification - Russian River Brewing Co.
Cherry Chocolate Beer - O'Fallen Brewery
La Folie - New Belgium Brewing
Midas Touch - Dogfish Head Craft Brewery
Fraoch Heather Ale - Craigmill Brewery
Highland Heather Ale - Highland Brewing Co.
#9 - Magic Hat Brewing Co.
Patty's Chili Beer - Wynkoop Brewing Co.
Chateau Jiahu - Dogfish Head Craft Brewery
Temptation - Russian River Brewing Co.
La Roja - Jolly Pumpkin Artisinal Ales
Grand Cru - Upstream Brewing Co.
Spruce Budd Ale - Fort George Brewery

WINTER BREWS

Old Jubilation Ale - Avery Brewing Co.
Winter Warmer - Harpoon Brewery
Powder Hound Winter Ale - Big Sky Brewing Co.
Feast of Fools - Magic Hat Brewing Co.
Cottonwood Frostbite - Carolina Beer Co.
Saint Arnold Christmas Ale - Saint Arnold Brewing Co.
Breckenridge Christmas Ale - Breckenridge Brewery
Samichlaus - Schloss Eggenberger
Full Sail Wassail - Full Sail Brewing Co.
Snow Cap Ale - Pyramid Breweries, Inc.
Summit Winter Ale - Summit Brewing Co.
Winterhook - Red Hook Brewing Co.
Butte Creek Winter Ale - Butte Creeke Brewing Co.
Sam Adams Winter Brew - Boston Beer Co.
Ubu Ale - Lake Placid Pub & Brewery
Avalanche Ale - Breckenridge Brewery
Old Peculiar - T&R Theakston Brewery
Nutcracker Ale - Boulevard Brewing Co.
Black Diamond Winter Ale -Black Diamond Co.

Tuesday, June 1, 2010

Microbrew Madness!

It's easy to get into homebrewing and easy to get out homebrewing, but I recently found a happy place so that it doesnt matter if I am homebrewing or not. It's not a new phenomena. It's been around for decades now, but I am into it more than ever. It also goes great with homebrewing because it opens up the idea to more recipes and clone-like beers. It's called microbrew, and New Jersey's loose liquor licenses allow me to obtain these beers individually and at cheap costs versus pennsylvania.

Why would I drive to NJ just to get beer? It's simple. I drive to NJ to work, so i just make pit stops to pick up a new brew here and there. I stumbled upon this one particular liquor store that carries a large, constantly varying supply of 22-24 oz individual bottles.

I've been stocking up and am aging some of the better beers, but also have some beers available to me for immediate consumption. I will be posting them as I get them and encourage you to make suggestions to me. I'm always willing to try a beer for the first time.

In the first week, I obtained:

Bear Republic Hop Rod Rye Specialty Ale - A Healdsburg, California production. It is a high performance, turbo charged, alcohol burnin monster ale with dual overhead hop injection, made with 18% rye. This beer sits at 8% ABV. check it out at www.bearrepublic.com

Status: Consumed! This was an exceptional brew. Full-bodied, heavy beer intended for men with hair on their chests.

Hoffmann Lager Doppel Bock - A Roselle Park, NJ local commodity made by Climax Brewing Co. This lager is brewed with the strict German Purity Law, Rhineheitsgebot. This doppel bock is brown in color with a massive malt profile and soft chocolately notes accententuated by by noble hop aromas and flavors.

Status: Consumed! An amber dark beer, also full-bodied. I kicked back 64 ounces of this high alcohol beer and passed out drunk on the couch. Absouletly recommend it.

Stone IPA - India Pale Ale brewed and bottled by Stone Brewing Co. in San Diego, CA This 6.9% hop overload is just that. To say that this IPA is deliciously hoppy would be putting it modestly. Stone IPA has a big hop aroma and big hop flavor. Combine the two and you get the result of beauty.

Status: Aging

Lagunitas Limited Release Wilco Tango Foxtrot - An incredible name for a beer I must say, this West Coast Petaluma, CA beer is a Malty, Robust Ale with 7.83% ABV. All i can say is, I can not wait until the day where I am thinking WTF, how about a WTF? Wilco Tango Foxtrot, you are my hero and can not wait to consume you.

Status: Aging

Stone Smoked Porter - brewed and bottled by Stone Brewing Co in San Diego, CA. This 5.9% bottle is currently aging, though I have enjoyed this beer many times in the past. This dark, malty, smoky porter is great for BBQ meats and chocolates, cheesecakes, and other rich desserts. In this fantastic porter you will find rich chocolate and light smoky undertones complimented with hints of licorice and dark fruit, and perhaps some caramel.

Status: Consumed and Aging

Chimay Grande Reserve - Brewed at Scourmont Abbey and Bottled by Bieres De Chimay, Belgium. This 9% trappist ale is just that. Certified Trappist. A trappist ale certifies that it was brewed within the walls of an existing trappist monastery under the control of the trappist community. A major part of the sales revenue is used by the monks to support charitable works. This beer was designed partly by the exceptional yeast isolated by Father Theodore. Combine that with the purity of the protected water of the abbey's wells and you have one tasty Chimay. Chimay is aged for a lengthy period and served slightly chilled. I love this beer!

Food for thought - The best brewery to operate is by employing people that don't consume alcohol. This ensures maximized profits. Sell it to me, I'll drink it and enjoy it and in doing so, my buzz helps charities.

Status: Enjoyed and Aging

Noteworthy Remarks

Some noteworthy remarks are in regards to the origins of the IPA (India Pale Ale) and the German Purity Law. India Pale Ale's were simply put, an accident that resulted in great hoppy flavor. English Pale Ale's were shipped over seas to its British soldiers fighting in India a long time ago. It would take months for the beer to be shipped from Britain to India, so brewmasters used extra hops so that the beer would keep fresh for the 6 month voyage. Hops are a natural preservative, so if you add more hops, you are adding more preservatives. The result of a super-hopped English Pale Ale.........an India Pale Ale loaded with hop flavor and hop aroma. Not intended for the MillerLite wussy.

The German Purity Law (Reinheitsgebot) is just what it says. The Germans have long held high standards to what is utilized in its beers, so they designed a set of standards. The law states that all German beers must made using water, barley, and hops, and nothing more. Sounds like most beer, right? Wrong. Beers use flavorings, corn maize, brown sugar, dark candi sugar, etc. to produce their beers. This law originates back to 1516 ( I believe King Henry VII). The only odd thing about the original law is that yeast was not mentioned, which was later added to the law in the 1800's. Commercial breweries and even microbreweries love to market their beers as abiding brews of the German Purity Law. Look for it on certain beers.

Conclusion of the Day

Don't think for 30 seconds that the above list are the only beers I have ever consumed, these are beers that I am just recently collecting, aging, consuming, and profiling for my own enhancement in beer flavor, character, aroma, origin, etc. I will surely add more in the near future, so please check back and post any comments below.

Orange Pale Ale

What a delicious beer, and its not even fully aged yet. April 27, a few of us (Rich, Dawn, Jill, Lenny, and myself) brewed an orange pale ale. This was the third batch on the new system. The wheat beer and the cream ale missed their target temps, resulting in uncoverted sugars. This in turn leaves the beer tasting very sweet and having a low alcohol content. Bad news is that I dumped the beers down the drain. The good news is that these 2 beers only cost $15 each to produce, so I didnt lose out too badly. I also learned a lot from these 2 mistakes which has no monetary value to it.

3rd times a charm, right?

It sure is. This recipe was loaded with ingredients, and costly. There was no room for error. Here's the breakdown.

Recipe Type: All Grain
Yeast: Safale-04
Yeast Starter: Yes
Additional Yeast or Yeast Starter: No
Batch Size (Gallons): 5.5
Original Gravity: 1.054
Final Gravity: 1.013
IBU: 34
Boiling Time (Minutes): 60
Color: 9.0L
Primary Fermentation (# of Days & Temp): 10 @ 60-ish
Additional Fermentation: n/a
Secondary Fermentation (# of Days & Temp): 14 @ 60-ish
Tasting Notes: Orange/coriander low in the profile, compliment fruitiness from Cascades.


Size: 5.5 gal
Efficiency: 68.0%
Attenuation: 75.0%
Calories: 178.22 per 12.0 fl oz

Original Gravity: 1.054 (1.045 - 1.060)
=================#==============
Terminal Gravity: 1.013 (1.010 - 1.015)
==================#=============
Color: 6.0 (5.0 - 14.0)
===============#================
Alcohol: 5.27% (4.5% - 6.0%)
================#===============
Bitterness: 33.78 (30.0 - 45.0)
============#===================

Ingredients:
9 lbs Maris Otter
1 lbs Vienna Malt
1 lbs Crystal Malt 10°L
1 oz Cascade (5.5%) - added first wort, boiled 60 min
1 oz Cascade (5.5%) - added during boil, boiled 10 min
1 oz Cascade (5.5%) - added during boil, boiled 5 min
1 oz Cascade (5.5%) - added during boil, boiled 1 min
2 ea Fermentis S-04 Safale S-04
2.0 oz Cascade (5.5%) - added dry to secondary fermenter
2.0 oz Orange zest - added during boil, boiled 10.0 min
1 oz Coriander crushed - added during boil, boiled 10 min
Whirlfloc - added during boil, boiled 15 min

I mashed this beer at 155F and sparged at 170F. I nailed these numbers to the money. There were a few differences however. I was supposed to end up with 5.5 gallons of brew, but my evaporation rate is higher than my calculated 14% per hour. After an hour of boiling i ended with roughly 5 gallons beer. Thus, my Orignal Gravity was 1.064. This created a few key differences in the beer versus the recipe.

1.) More alcohol - 6% versus 4.75% (that's good with me)
2.) More potency in orange flavor and hop flavor than intended (not a bad thing either, just not as balanced as original recipe)
3.) Less beer than intended (not a good thing. I like to maximize my ROI on ingredients)

I fermented for 10 days at 68F and with the yeast starter it was off to a ferocious start, bubbling like an active volcano. After 10 days in the primary fermenter, I transferred it to my secondary fermenter and added additional hops (dry hopping) and fermented for another 10 days. The final gravity of the beer was 1.014, a 6% beer.
I then transferred it to my keg and it has been there ever since May 13.

I drank a beer last night and it was orangey and hoppy, however not fully carbonated or aged. It will beome drier and crisper in just a few weeks. Can't wait to enjoy it. I'll have you over.

Cheers!

Sunday, March 28, 2010

The Test Run

Setting Up

Setting up is the easy part about this brewery. It's already set up. It only requires some standard procedures in order to operate. Another reason everything is stainless steel is for easy sanitizing. Sanitation is 70% of brewing, so it's a crucial element. I use 2 sanitizers - Iodopher and Powder Brewery Wash (PBW). I can take my lids, hoses, quick disconnects, ball valves, and miscellaneous fittings and put them all in a bucket filled with Iodopher. The kegs themselves will be sanitized with PBW. During today's test run I didn't sanitize at all because I wasn't making beer, I was simply testing the brewery for any malfunctions.

Watching It Go Down

First, I ran to Home Depot and purchased a second propane tank in the event I ever run out of propane in the midst of a brew session. Then, I found a recipe for an American Wheat and mocked the recipe instructions. The recipe was an 11 gallon batch of American Wheat, which required 9.4 gallons of water for the HLT and 8.725 gallons of water for the MLT. I simply used garden hose water and filled up the two vessels. The recipe called for HLT temps of 184 F and MLT temps of 145 F.

I then powered up the control panel and turned on my temperature controllers. The water was reading 50 F in both vessels. I wonder if my tap water will be 50 F in the middle of a heat wave. Being that this was the first time I fired up my brewery, I was careful to take notes on just about all changes that occured. Moving along, I created set points as per the recipes instructions, setting the HLT to 184 F and the MLT to 145 F.

The following temps-over-time occurred, yielding some interesting evidence:
The above chart tells me a few things. Both kegs had the same starting values of 50 F. In just 22 minutes there was a 7 degree difference between the MLT and the HLT. In 30 minutes, there was a 10 degree differnce which pretty much held that way until the MLT hit 145 and turned off. This tells me that the MLT burner is putting out more btu's than the HLT. I'm not worried about it though. The above data also tells me to be careful about my set point temperatures because after the burner turns off the temps continue to increase. The MLT increased 8 degrees between 2:56 and 3:22 and the burner wasn't even on. I also recorded some other interesting data. Don't forget that I also have analog temperature gauges on each keg. I was reading the analog gauge on the MLT both while the burner was on and after. The digital temperature probe sits at the bottom of the keg and the analog is in the middle. I need to take into account the differences in distance to the flame. At 3:22, the MLT burner was off and the digital temperature controller was reading 153. However, the analog was reading 148. My original set point was 145, so i exceeded that on both regards. It shouldn't come to any surprise that the top of the keg water is cooler than the bottom. I do realize that when i dump room temperature grains into the MLT this will take about 2 degrees off the temps, giving me 151 and 146. I will probably set my differential to 2 degrees less than recommended. -2 degrees minus 2 degrees when taking into account room temperature grains would give me about 149 and 144. That's good enough for beer man!!!!

I was a little disappointed in how long it took to heat up 9.4 gallons to 184 F from 50 F (1:02 to be exact), but I can deal with it. I was running the burners at about 50%. For the HLT I could run it at 100% and cut out some time, but with the MLT I can't risk scorching the grains. I'll keep it as-is. I had the valves open 100%, but had the PSI regulator at about 50%. I burned through about 1/8 off the propane tank. That's good news.

After I succeeded in hitting my temps I moved along to the chilling faze. I tested the BK burner just to make sure it properly operated, but didn't want to sit there and watch it boil water for 60 minutes. If i was boiling beer, it would have been different :)

Chilling the Beer

The chilling faze is important in the beer making process. Simply put, the idea is to get the beer from boiling temperatures to about 68 F as fast as possible in order to pitch the yeast. The old school way is to fill a bath tub with ice water and put the keg in there to chill. That can take an hour or two, sometimes more. Some people use wort chillers, which consist of copper or stainless tubing that sits in the keg, where cold water is circulated through it. I myself purcased the Therminator, which has got to be the coolest device in homebrewing, just very expensive.


The therminator has 2 inlets, and 2 outlets. There is a wort inlet/outlet and a water inlet/outlet. There are 2 chambers in the therminator, one for the beer and one for water. theyt do not mix. I use Pump 1 to recirculate the beer through the therminator and attached a garden hose to run 50 F water through the therminator as well. At 5 gallons per minute, I was able to reduce 140 F beer (water today) to 68 F in 10 minutes. I'll take that any day.

That was it for today. A quick clean up and blog post will call it quits. I will be brewing the first batch in about 2 weeks. More updates to come.

cheers!

4 Months of Building!

After i joined http://www.homebrewtalk.com/ I knew it was time to upgrade my beer brewing from partial mash to all grain (AG). It's a big leap for most homebrewers, but one that is very rewarding. Going AG with the right equipment allows any homebrewer to more actively control various factors; making a personal favorite over and over again, with consistency. Partial Mash brewing in buckets is less controllable, essentially making it harder to produce the same beer time and time again.

So in November I decided to take the leap and began looking at various designs. There are gravity fed systems which rely on gravity for the flow of wort from one kettle to the next, or single tier systems that rely on pumps and/or siphons to get the wort from one kettle to another. I didn't like the gravity fed systems as they tend to sit up pretty high. I didn't want something in my garage that was towering the ceiling, so I went with the single tier system. It is 52" wide and holds 3 kegs. From left to right, the Boil Kettle (BK), Mash Lauter Tun (MLT), and the Hot Liquor Tun (HLT). The system I went with is known in the homebrew community as H.E.R.M.S. This is an acronym which reads Heat Exchanging Recirculating Mash System.

THE STAND

The brewery, which is yet to be named, consists of a stainless steel structure composed of 40 feet of 2" x 2" x 1/8" square tubing. Stainless doesn't rust, which was an appealing factor when choosing my metal. It sits on wheels for easy transport to the driveway (where I will brew). 40 feet of stainless steel tubing weighs roughgly 200 pounds, so you can see the need for wheels on the stand. As you can see from this picture, there is just the right amount of space for the BK, MLT, and HLT.

Thanks to Joe the Welder, we were able to weld this together over one weekend. It took a lot longer than originally anticipated, but turned out good enough for government work, and good enough for beer. Some welds turned out great, some were adequate, and others were a complete embarrasment. It must have been the hex chrome getting to us because i think the welds got worse as we progressed.


THE KETTLES


Billy D was kind enough to supply me with 3 kegs, which serve as the BK, MLT, and HLT. It took some preparation to get them to serve as a kettle, but with stainless steel kettles in the 15 gallon range, I just saved myself about $900. Kegs are stainless steel FYI. This is why they increased deposits on kegs a few years back. The kegs are simply worth more than a $10 deposit. In fact, they are worth more than $30, but commercial breweries can only implement a deposit so high before they scare off customers. Anyway, I spent some time polishing up the kegs, making them look pretty - cutting out the tops of the kegs, and welding in 2 couplings per keg. The lower coupling on each keg serves as the drain outlet and the upper coupling houses an analog temperature gauge.


PLUMBING

After working on the stand and the kegs, came the fun part - the Gas Plumbing and the Control Panel. It was time to make this system operational. I ordered up some 10-tip low pressure jet burners with a self-standing pilot. The actual plumbing was bought at Home Depot and was no more than $50. I'm no professional plumber, and I'd rather keep it that way, but I think I am actually at code with this thing. The burners operate from an adjustable PSI regulator hooked up to a propane tank. The plumbing runs across the stand horizontally and then has vertical shoots which house the burners. Each burner has a ball valve for the pilot (to regulate gas flow) and a ball valve to the burner (again, to regulate gas flow). The middle burner (MLT), and the right burner (HLT) have an asco valve associated with the plumbing. These asco valves are electrical, and are normally closed in position by default. The valve sends signals to the control panel, which operates my temperature controllers, telling the valve when to open and when to close, allowing or disallowing a flame to come out of the burner. This regulated, automated burner allows me to set a temperature point and hold steady. For example, If i wanted to set my HLT to hold at 185 F, the digital temperature controller signals the asco valve to open, allowing a flame to heat up the keg. When the temperature of the water in the HLT hits 185 F, the asco valve shuts, turning off the burner until the temp drops to 184 F, where it then fires back on until it his 185 F again, process repeating.

Take a look at the temperature controllers on the control panel and the burner set up. The temperature controllers have electrical probes that sit in the kegs, taking constant temperature readings of the HLT and MLT. The Asco valves are the green valves which has the wiring.


After I wired up the valves to the control panel I was able to test out the burner.......and wow!!! These burners put out some serious juice. It literally sounds like a mini jet engine. I was very skeptical about being to close at first. The sound was somewhat frightening. I had a few gas leaks at first, but pipe dope on every connection sealed everything up very well.

The control panel has a few components to it. It has a main power supply which runs to the wall outlet of my house, or any house for that matter. It has 7 switches in total: Main Power switch, Left Digital Temperature Controller, Right Digital Temperature Controller, Left Asco Valve, Right Asco Valve, Pump 1 and Pump 2. The wiring was color coded, Green being ground, White being Neutral and Black being Hot. It was messy, but it worked.


Next came the final stages of this build, the pumps and hoses.

PUMPS

The pumps and hoses assist in the transfer of wort, water, and mash from one keg to the other. These kegs get extremely hot in just a few moments of operation and also get extremely heavy when filled with liquid and grains. I could have saved some money and just used a siphon, but that would be no fun. The pumps do all the work. There are two pumps which operate simultaneously and independently depending on the current task. The hoses themselves all have quick disconnects for interchangeability. I also put a safety cover over the pumps to prevent them from any spillage.


Finished Product

Take a look. See for yourself. Judge for yourself when you drink some of the delicious product that comes from it. I have a twin tap kegerator so i will have two beers on tap at any given point. I intend to brew in just a few weeks, so it will be about 6 weeks from today that we can enjoy this beer together. If you can't make this round, there will be plenty more to come.